

Delete unwanted apps in a flash from your iPhone, no matter if you want to tune up its performance or improve your privacy protection. Read on to learn more about the different ways to remove apps. Also discover how you can enjoy a more private surfing experience thanks to the VPN built into Avira Mobile Security.
Why should I remove iPhone apps?
There are a host of reasons why you may want to remove apps from your device. One of the most frequent reasons is to free up storage space. That’s because each app consumes a portion of memory, sapping your iPhone’s performance. If you no longer use an app, you can remove it and free up precious space.
Removing apps also helps to help you control your smartphone use. Say you want to cut your consumption of social media, you can simply remove the app in question. You can still access the platform via a browser, but the temptation to take a quick peak at your feed is drastically reduced.
Which apps can I remove on my iPhone?
You can remove any app you installed yourself. These include games as well as first-party and third-party social-media apps. If you change your mind, you can simply head on over to the App Store and download the app again. In the case of certain pre-installed apps, you first need to take some additional steps to remove them.
How do I remove pre-installed iPhone apps?
It’s easy to remove certain pre-installed Apple apps that came with your device. These include Compass, Calculator, and Wallet. The good news is that if you remove Wallet, all your data remains safely stored in the cloud, such as your bank cards and tickets.
It’s often the case, though, that you need to take some additional steps to remove pre-installed apps from your iPhone. For example, you can only remove the Watch app if you unpair your Apple Watch first.
By the way: You can only remove certain built-in iPhone apps. Ones you can’t remove include Photos, Camera, and the App Store — although you can hide them.
How do I remove apps from my iPhone?
There are different ways to remove apps from your iPhone — whether from the Home Screen, the App Library, or via the Settings app. Let’s take a closer look at each option.
Remove apps from the Home Screen
The easiest way to remove apps from your iPhone is from the Home Screen. Here’s how:
- Select the app: Touch and hold the app you want to remove until the menu appears.

- Remove the app: Select Remove App from the menu. In the next step, you can decide whether you want to remove the app only from the Home Screen or delete it from your iPhone all together.
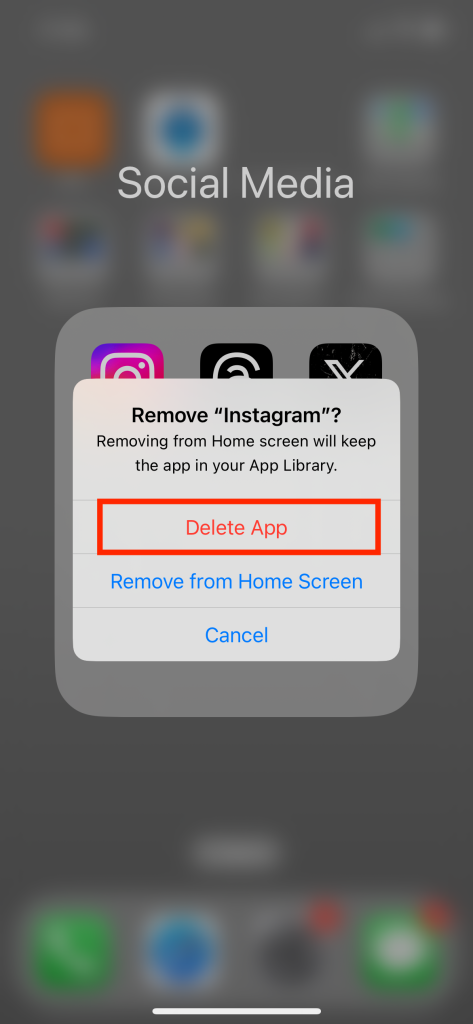
- Delete the app: Finally, select Delete App to complete the removal process.

By the way: If you want to delete multiple apps on your iPhone, touch and hold an empty area on the Home Screen. After a moment, a minus symbol will appear in the upper left corner of each app icon. Tap the symbol, then follow the steps described above to remove the app. Repeat the process for all the apps you want to remove and then tap Done on the top right of the screen.
How to delete apps from your iPhone App Library
If you hide apps on your iPhone, you simply remove them from the Home Screen. This means you can still access them via the App Library. If you want to permanently delete the apps that are hidden from your Home Screen, follow these steps on your iPhone:
- Open the App Library: Keep swiping left on the screen until you get to the App Library.
- Select the app: Touch and hold the desired app until the menu opens where you can choose to delete the app.

- Confirm deletion: Tap Delete to confirm you want to remove it.

How do I delete an app from the App Store?
Another way to delete an app is via your iPhone’s App Store, but you need to have updated the app first. Once it’s up to date, follow these steps:
- Open the App Store: Launch the App Store on your device and tap your profile picture on the top right.

- Swipe across the app: Under Updated Recently, you’ll find all the apps that have recently been updated. Find the app you want to remove and simply tap it while swiping left.

- Delete the app: Once a red bar with Delete appears, tap it to confirm your choice.

Delete apps via your iPhone’s Settings app
You can also delete apps via the Settings app. To do this, open the Settings app and follow these steps:
- Tap General: Tap General (the entry with the gear icon). Now tap iPhone Storage.

- Select the app: Tap the app you want to delete. A menu will now open. Tap the Delete App button at the bottom.

- Confirm deletion: Finally, confirm you want to delete the app.


Are deleted apps also removed from iCloud?
When you delete apps from your iPhone, the app data is still stored in iCloud. If you’d like to free up more storage space and not only clean up your iPhone but also delete apps from iCloud, follow these step-by-step instructions:
- Open the Settings app: Go to the Settings app and tap your profile picture. Under iCloud, you’ll find the option Manage Account Storage.
- Select the app: Tap the app you want to remove all traces of and confirm your selection by tapping Delete Data from iCloud.

- Remove the backup: In addition to individual apps, you can also delete iPhone backups from iCloud. To do this, tap Backups in the Manage Account Storage section and then tap the name whose backup you’d like to delete.
- Set the toggle switch to off: You’ll see a list of all the apps and their data stored in the iCloud backup. Remove the desired data by sliding the toggle switch to the left, turning it off. It will then turn gray.


Clean up your iPhone by offloading app data
Instead of deleting apps from your iPhone along with their data, you can also offload them. This frees up the storage space used by the app, but keeps its documents and data. They’ll be restored when you reinstall the app as the documents and data are saved in iCloud. Here’s how to offload an app:
- Open the Settings app: Go to your device’s Settings app and tap General.

- Tap iPhone Storage: Select iPhone Storage and tap the app you want to offload.

- Offload the app: Tap Offload App and confirm you want to do that by selecting this option again in the next step.


By the way: You can clear the app cache, remove unnecessary media, and free up more storage space on your device with an iPhone clean up. Also want to speed up your Mac or PC? The Optimizer built into Avira Free Security will help you do exactly that as well as release more disk space and memory for faster starts.
Can’t remove apps from your iPhone? Yes you can
If you can’t remove apps from your iPhone, the feature is probably turned off in the settings. To check this and resolve the issue, follow these steps:
- Open the Settings app: Go to your iPhone’s Settings app and tap Screen Time.
- Check for restrictions: Under Screen Time, tap Content & Privacy Restrictions. Is the toggle switch green? Then the setting may be preventing you from deleting apps from your iPhone.
- Allow deletion: Tap iTunes & App Store Purchases and set Deleting Apps to Allow. You should then be able to delete unwanted apps.
Make your Apple device more secure
In addition to storage space, you should also keep an eye on your device’s security. Compared to Android smartphones, iPhones are more secure. This is partly because Apple’s market share is smaller and cybercriminals tend to focus on widely used systems. In addition, iOS is a closed system that allows only a few interfaces. Apps run in a secure area where they cannot interact with other apps or the operating system. This means that malware hidden in apps cannot damage the device. As a result, you don’t need virus scanners for iPhones. That’s because these apps also only run in a protected area.
But that doesn’t mean iPhones are immune to web-based threats. As such, it makes sense to protect your device while browsing — especially when you’re connected to unsecured networks. Avira Mobile Security for iOS routes all the data you send and receive over public Wi-Fi hotspots through a secure tunnel so third parties cannot access it. The solution also prevents Siri from recording conversations without you knowing — for a more secure surfing experience on your iPhone.